Ultimate Pizza Bomb Recipe: Homemade Dough and Delicious Fillings
Welcome aboard to a culinary adventure where every bite takes you to new heights with Pizza Bombs! Get ready to experience the ultimate in-flight snack with our delectable Pizza Bomb recipe. These savory sensations are like little aircraft of flavor, ready to take off into your taste buds and soar through the skies of satisfaction. Crafted with precision and passion, our Pizza Bombs are the perfect blend of doughy goodness, zesty marinara, and cheesy indulgence, all wrapped up in a delectable package. Whether you’re craving homemade pizza bombs, cheesy indulgence, zesty marinara, or savory sensations, our recipe promises to satisfy your taste buds with every bite.

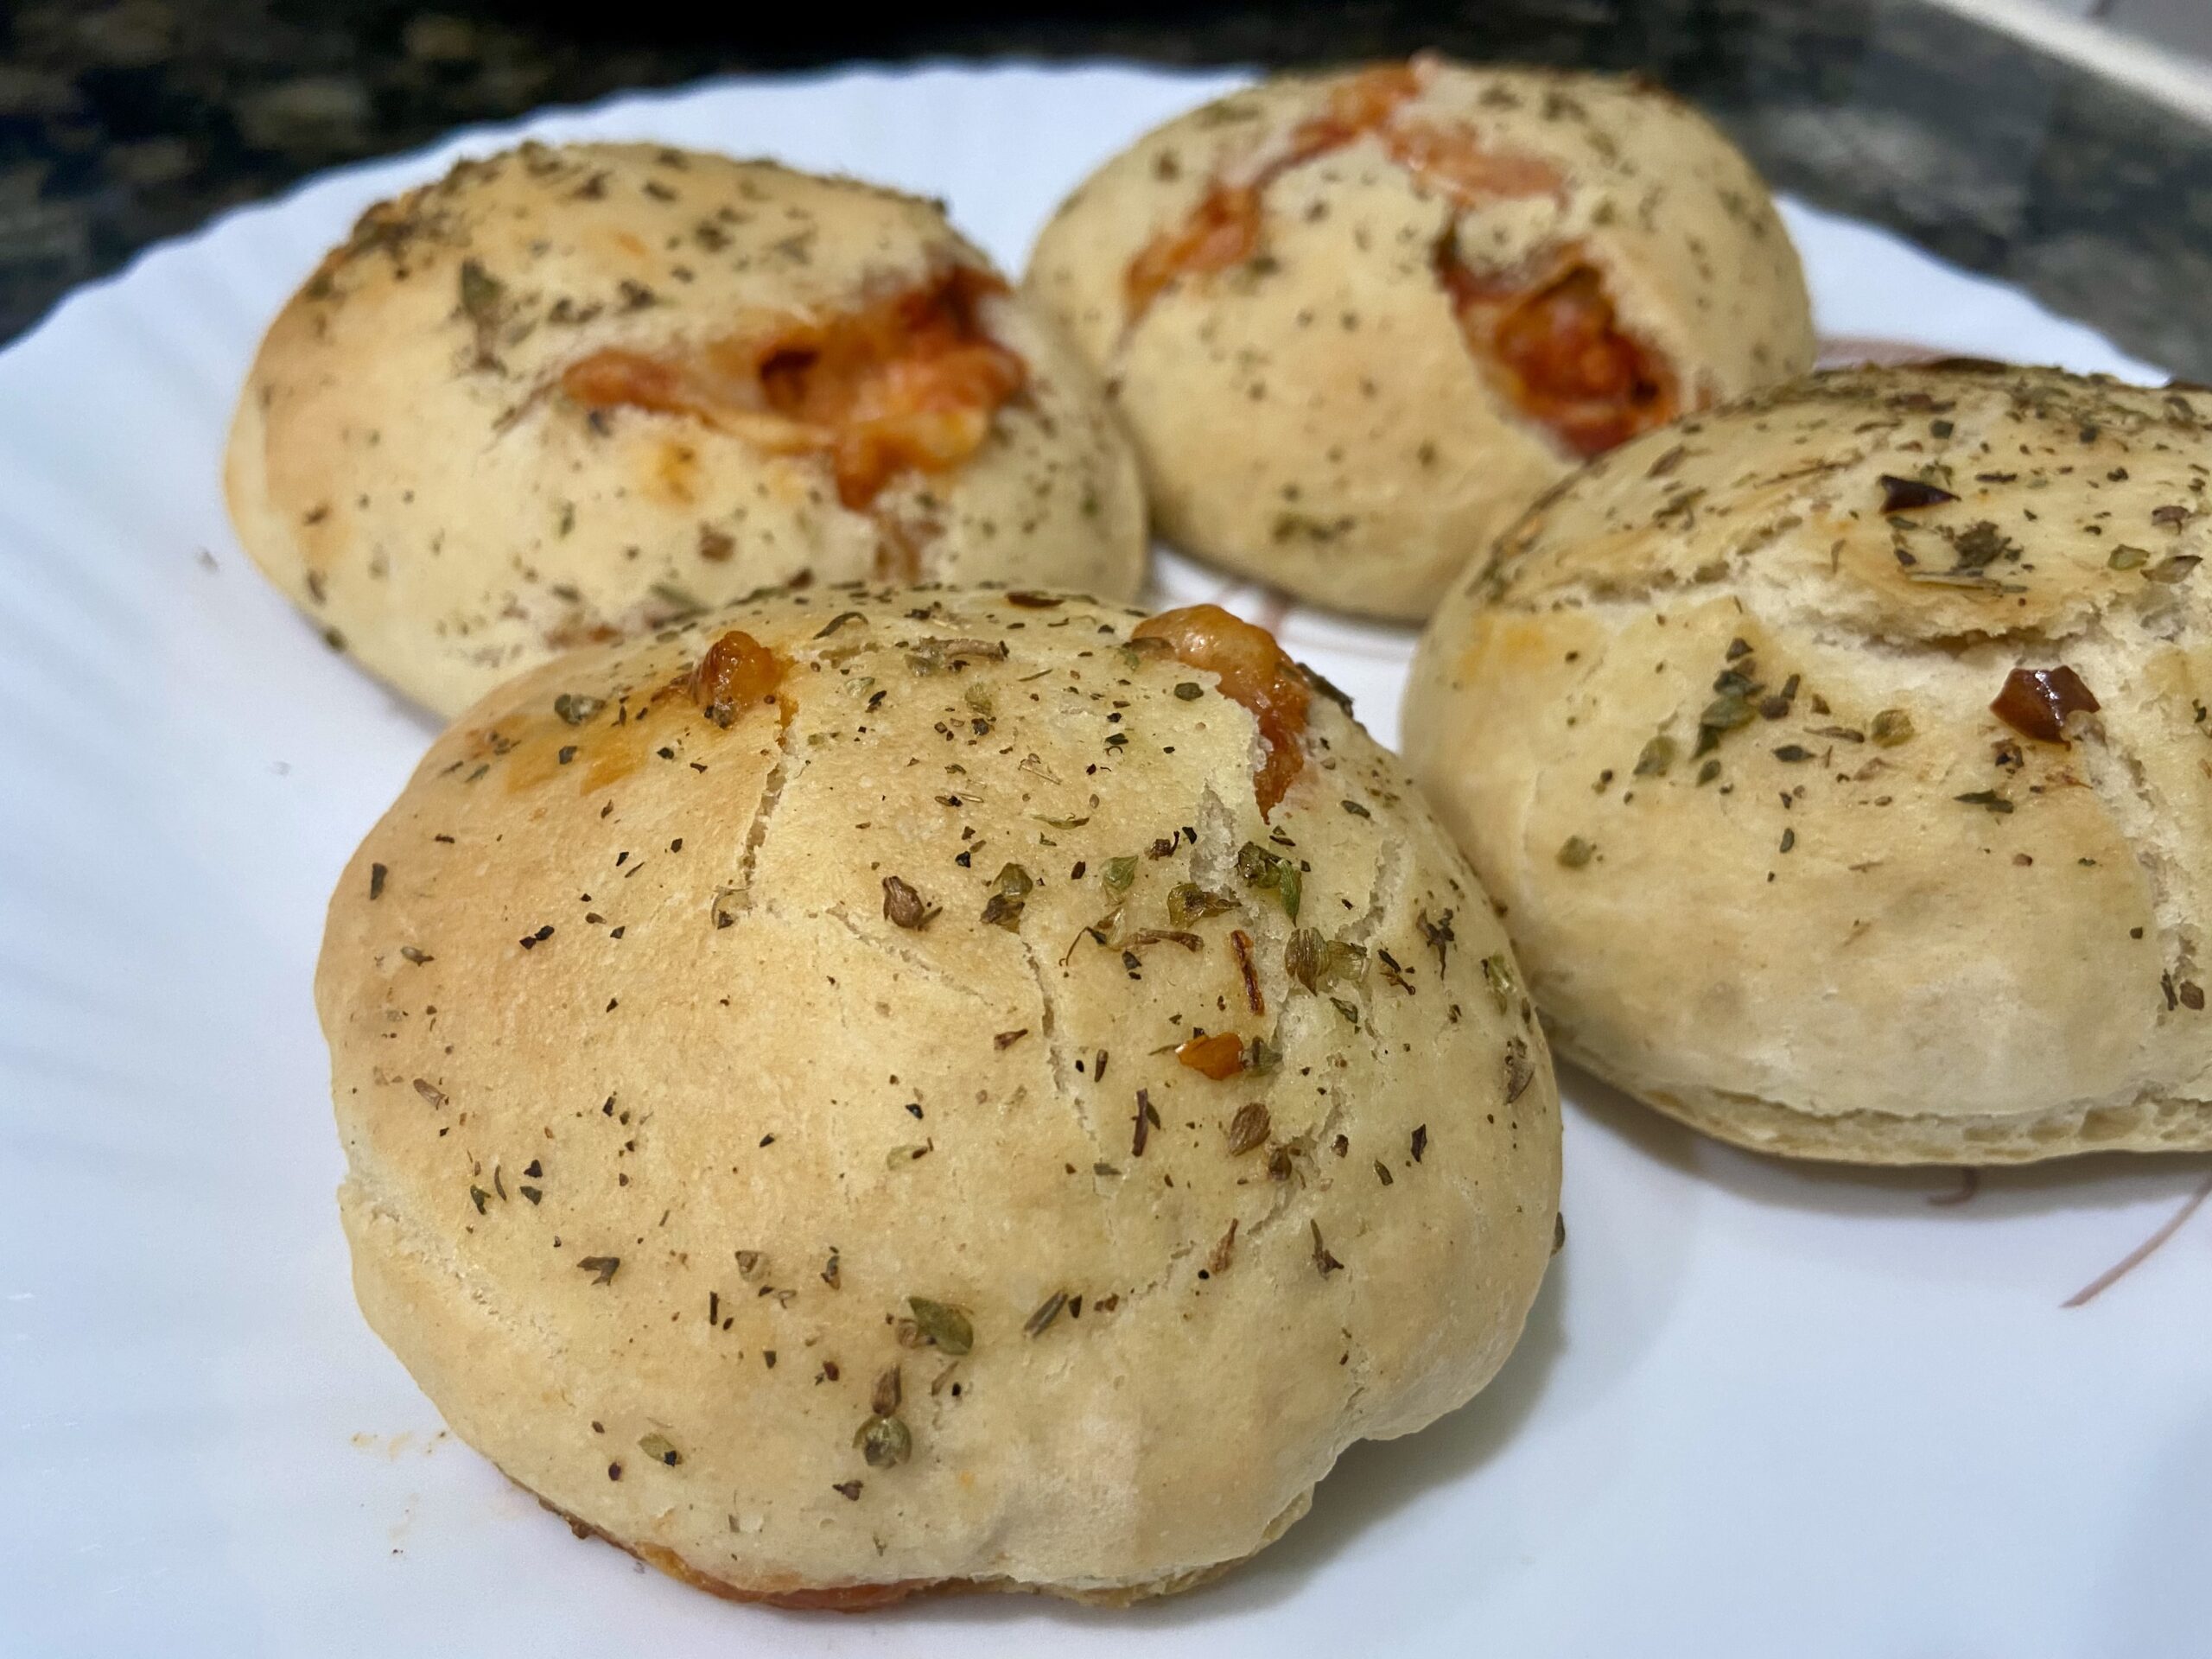
Discover the irresistible allure of Pizza Bombs, the ultimate savory sensation that combines the flavors of pizza into a convenient, handheld delight. Whether baked in the oven or prepared in an air fryer, these delectable treats are crafted with doughy perfection, oozing with gooey cheese, zesty marinara sauce, and your favorite toppings like pepperoni or chicken.
Perfect for parties, game nights, or a quick snack fix, Pizza Bombs are versatile and easy to customize to suit any palate. Dive into our collection of recipes featuring homemade dough, Pillsbury biscuits, or crescent rolls to create your own culinary masterpiece.
Why Pizza Bombs Are the Perfect Snack at 30,000 Feet
Imagine sitting in the comfort of your own kitchen, crafting these delightful snacks that are reminiscent of inflight dining. Pizza Bombs aren’t just delicious; they’re versatile delights that can be enjoyed as appetizers, snacks, or even a meal on the go. Picture golden-brown dough filled with gooey cheese, zesty marinara sauce, and your favorite toppings like pepperoni or chicken. These bites pack a punch of flavor and are perfect for fueling your next adventure.
Exploring Different Pizza Bomb Recipes
The beauty of Pizza Bombs lies in their adaptability. Whether you’re using a muffin pan, baking in the oven, or opting for the efficiency of an air fryer, each recipe promises mouthwatering results. Experiment with variations like gluten-free options or vegetarian twists to ensure everyone on your flight—metaphorical or actual—can indulge in these tasty morsels.
Ingredients
Pizza Dough:
1/2 Cup Warm Water
1 Tsp Yeast
11/2 Cup Flour
1 Tsp Sugar
Filling:
Pizza Sauce
Mozzarella Cheese
Bell Peppers (OTP)
Jalapeño Peppers
Brush On:
1 Tbsp Oregano
2 Tbsp Melted Butter
1 Tsp Black Pepper
1/2 Tsp Chilli Flakes
Nutritional Facts
Amount per serving (6 total)
- Calories: 249
- Fat: 11 grams
- Carbohydrates: 29 grams
- Protein: 8 grams
Allergy Information:
Our Pizza Bombs contain dairy from Mozzarella cheese and butter. They also include all-purpose flour, a common source of gluten. Please be aware that allergens may vary depending on the specific ingredient brands used. If you have food allergies or dietary restrictions, we recommend checking the ingredient labels carefully or consulting with your healthcare provider before consuming.
Instructions
1. Pre-flight check (Prepare the Dough):
Begin by combining warm water, sugar, and yeast in a mixing bowl. Stir gently and let it rest for 5 minutes until it becomes foamy, activating the yeast.
Once the yeast is activated, add the all-purpose flour and knead the mixture until it forms a smooth dough.
2. Clear for Takeoff (Let It Rise):
Cover the dough with a drizzle of olive oil and let it rise in a warm place for 2 hours, allowing it to double in size.
3. In-flight Assembly (Shape and Fill):
After the dough has risen, divide it into 6 equal portions and flatten each piece into a circle.
Spread marinara sauce onto each dough circle, then layer with your favorite toppings like mozzarella cheese and optional jalapenos and bell peppers.
4. Cabin Crew Ready (Seal and Brush):
Bring the edges of the dough circle together and pinch to seal, forming a ball-shaped pizza bomb.
In a separate bowl, combine melted butter, oregano, black pepper, and chili flakes. Brush this flavorful mixture over the assembled pizza bombs.
5. Landing Approach (Bake to Perfection):
Place the prepared pizza bombs on a greased baking tray and bake them in a preheated oven at 350°F for approximately 17 minutes, or until they turn golden brown.
6. Final Destination (Serve and Enjoy):
Once baked to perfection, remove the pizza bombs from the oven and allow them to cool slightly before serving.
These crowd-pleasing delights are perfect for any occasion, offering a satisfying serving size that’s ideal for sharing with friends and family.
Preparations
Step 1: Activate the Yeast
Begin by combining warm water, sugar, and yeast in a mixing bowl. Stir gently to dissolve the sugar and yeast completely. Let the mixture sit for 5 minutes until it becomes frothy and activated. This step ensures a perfect rise and fluffy texture for your pizza dough.
Step 2: Mix and Knead the Dough
After the yeast is activated, gradually add the flour to the mixture. Using your hands or a stand mixer with a dough hook, knead the ingredients together until they form a smooth and elastic dough. Drizzle a bit of olive oil over the dough, turning to coat evenly. Cover the bowl with a clean kitchen towel or plastic wrap. Allow the dough to rise for about 2 hours in a warm, draft-free place, until it doubles in size. This waiting period allows the yeast to work its magic, creating light and airy pizza bombs.
Step 3: Shape the Dough
Once the dough has risen, gently punch it down to release the air. Divide it into 6 equal portions. On a lightly floured surface, flatten each piece into a circle, approximately 6 inches in diameter. Spoon marinara sauce onto the center of each dough circle, leaving a small border around the edges to prevent spillage during baking. Sprinkle generously with shredded mozzarella cheese and add your favorite toppings such as diced bell peppers and jalapeños for a burst of flavor.
Step 4: Seal the Pizza Bombs
Gather the edges of each dough circle and pinch them together to seal, forming a ball-shaped bomb. Ensure a tight seal to prevent the filling from leaking out during baking. This step also helps the pizza bombs maintain their shape and texture.
Step 5: Prepare the Baking Tray
Lightly grease a baking tray with butter or olive oil to prevent sticking. Arrange the sealed pizza bombs on the tray, leaving space between each bomb for even baking. This preparation step ensures easy removal of the pizza bombs once they’re baked to perfection.
Step 6: Create the Flavorful Brush-On
In a separate bowl, melt butter and mix in dried oregano, ground black pepper, and chili flakes. Use a pastry brush to generously coat the tops of the pizza bombs with this seasoned butter mixture. This adds a burst of savory flavors and enhances the golden brown color during baking.
Step 7: Bake to Perfection
Preheat your oven to 350°F (175°C). Place the prepared baking tray with the pizza bombs into the preheated oven. Bake for approximately 17 minutes or until the pizza bombs are golden brown and the cheese is melted and bubbly. Keep an eye on them to ensure they reach the perfect level of crispiness and doneness.
Step 8: Serve and Enjoy!
Once baked to golden perfection, remove the pizza bombs from the oven and allow them to cool for a few minutes on the baking tray. Transfer them to a serving platter and serve warm. Bite into a warm and cheesy pizza bomb, savoring the explosion of flavors and textures with each mouthful. Whether enjoyed as a snack, appetizer, or even a main course, these delectable treats are sure to be a hit with family and friends alike.
Explore the ultimate pizza bombs recipes and techniques, featuring air fryer and oven cooking methods. From popular options like Little Caesars and Costco pizza bombs to homemade versions using pizza dough, crescent rolls, or biscuits, find delicious variations to suit every craving. Discover mouthwatering choices such as pepperoni pizza bombs and cheesy delights, perfect for gatherings or a quick snack. Learn how to make pizza bombs in an air fryer with our simple recipes and savor the irresistible flavors of these savory treats right at home!
Additional Tips
- Customize Your Fillings: Experiment with different toppings such as pepperoni, mushrooms, olives, or even pineapple to suit your taste preferences and create unique flavor combinations.
- Ensure Proper Sealing: Thoroughly pinch and seal the edges of each pizza bomb to prevent any filling from leaking out during baking, ensuring a tidy and delicious result.
- Make Ahead and Freeze: Prepare a batch of pizza bombs ahead of time and freeze them before baking. When ready to enjoy, simply bake from frozen, adding a few extra minutes to the baking time.
- Adjust Baking Time: Keep an eye on the pizza bombs as they bake. Depending on your oven and desired level of crispiness, you may need to adjust the baking time slightly.
Frequently Asked Questions (FAQ)
Can you freeze pizza bombs?
Yes, you can freeze pizza bombs before baking for future use. Simply assemble the bombs, place them on a baking sheet, and freeze until solid. Transfer to a freezer bag or container, and bake from frozen when ready to enjoy.
Can you air fry pizza bombs?
Yes, pizza bombs can be air fried for a quicker cooking option. Preheat your air fryer, place the assembled pizza bombs inside the basket, and cook at 375°F (190°C) for about 10-12 minutes or until golden and crispy.
Can pizza bombs be made gluten-free or dairy-free?
Yes, you can adapt pizza bombs to be gluten-free by using gluten-free flour or dough. For dairy-free options, substitute dairy-free cheese and butter alternatives in the recipe.
What are the best toppings for pizza bombs?
Popular toppings for pizza bombs include pepperoni, mushrooms, bell peppers, onions, olives, and jalapeños. Customize your pizza bombs with your favorite ingredients for a personalized taste.
Can pizza bombs be made ahead of time?
Yes, you can prepare pizza bombs ahead of time and refrigerate them before baking. They can also be stored in the refrigerator for up to 3 days after baking, reheating them in the oven or microwave.
How can i tell that my yeast is properly activated?
After mixing the yeast with warm water and sugar, it should start to foam and bubble within 5-10 minutes. If it doesn’t, the yeast may be expired or the water temperature might have been off. The water should be around 110°F (43°C). If the water is too hot, it can kill the yeast; if it’s too cold, the yeast won’t activate properly.
Ultimate Pizza Bomb Recipe: Homemade Dough and Delicious Fillings
Description
Savor the irresistible allure of pizza bombs, a delightful rendition of traditional pizza flavors packed into bite-sized marvels. These delectable treats feature pillowy dough wrapped around melty mozzarella, zesty marinara sauce, and a medley of toppings like pepperoni or vibrant bell peppers
Ingredients
Pizza Dough:
Filling:
Brush On:
Instructions
- Step 1: Activate the Yeast
Begin by combining warm water, sugar, and yeast in a mixing bowl. Stir gently to dissolve the sugar and yeast completely. Let the mixture sit for 5 minutes until it becomes frothy and activated. This step ensures a perfect rise and fluffy texture for your pizza dough. - Step 2: Mix and Knead the Dough
After the yeast is activated, gradually add the flour to the mixture. Using your hands or a stand mixer with a dough hook, knead the ingredients together until they form a smooth and elastic dough. Drizzle a bit of olive oil over the dough, turning to coat evenly. Cover the bowl with a clean kitchen towel or plastic wrap. Allow the dough to rise for about 2 hours in a warm, draft-free place, until it doubles in size. This waiting period allows the yeast to work its magic, creating light and airy pizza bombs. - Step 3: Shape the Dough
Once the dough has risen, gently punch it down to release the air. Divide it into 6 equal portions. On a lightly floured surface, flatten each piece into a circle, approximately 6 inches in diameter. Spoon marinara sauce onto the center of each dough circle, leaving a small border around the edges to prevent spillage during baking. Sprinkle generously with shredded mozzarella cheese and add your favorite toppings such as diced bell peppers and jalapeños for a burst of flavor. - Step 4: Seal the Pizza Bombs
Gather the edges of each dough circle and pinch them together to seal, forming a ball-shaped bomb. Ensure a tight seal to prevent the filling from leaking out during baking. This step also helps the pizza bombs maintain their shape and texture. - Step 5: Prepare the Baking Tray
Lightly grease a baking tray with butter or olive oil to prevent sticking. Arrange the sealed pizza bombs on the tray, leaving space between each bomb for even baking. This preparation step ensures easy removal of the pizza bombs once they’re baked to perfection. - Step 6: Create the Flavorful Brush-On
In a separate bowl, melt butter and mix in dried oregano, ground black pepper, and chili flakes. Use a pastry brush to generously coat the tops of the pizza bombs with this seasoned butter mixture. This adds a burst of savory flavors and enhances the golden brown color during baking. - Step 7: Bake to Perfection
Preheat your oven to 350°F (175°C). Place the prepared baking tray with the pizza bombs into the preheated oven. Bake for approximately 17 minutes or until the pizza bombs are golden brown and the cheese is melted and bubbly. Keep an eye on them to ensure they reach the perfect level of crispiness and doneness. - Step 8: Serve and Enjoy!
Once baked to golden perfection, remove the pizza bombs from the oven and allow them to cool for a few minutes on the baking tray. Transfer them to a serving platter and serve warm. Bite into a warm and cheesy pizza bomb, savoring the explosion of flavors and textures with each mouthful. Whether enjoyed as a snack, appetizer, or even a main course, these delectable treats are sure to be a hit with family and friends alike.
Notes
- Make sure the water is around 110 F to ensure the yeast rises properly.
- You can change up the toppings to your liking
- seal the dough properly so that none of the filling comes out.


